😎 공부하는 징징알파카는 처음이지?
[C++ 로 OpenCV 구현하기] (9) Project1 - Virtual Painter 본문
👩💻 IoT (Embedded)/Image Processing
[C++ 로 OpenCV 구현하기] (9) Project1 - Virtual Painter
징징알파카 2023. 6. 13. 19:47728x90
반응형
<본 블로그는 Murtaza's Workshop 의 유튜브를 참고해서 공부하며 작성하였습니다 :-)>
=> LEARN OPENCV C++ in 4 HOURS | Including 3x Projects | Computer Vision
🌀 Project1 - Virtual Painter
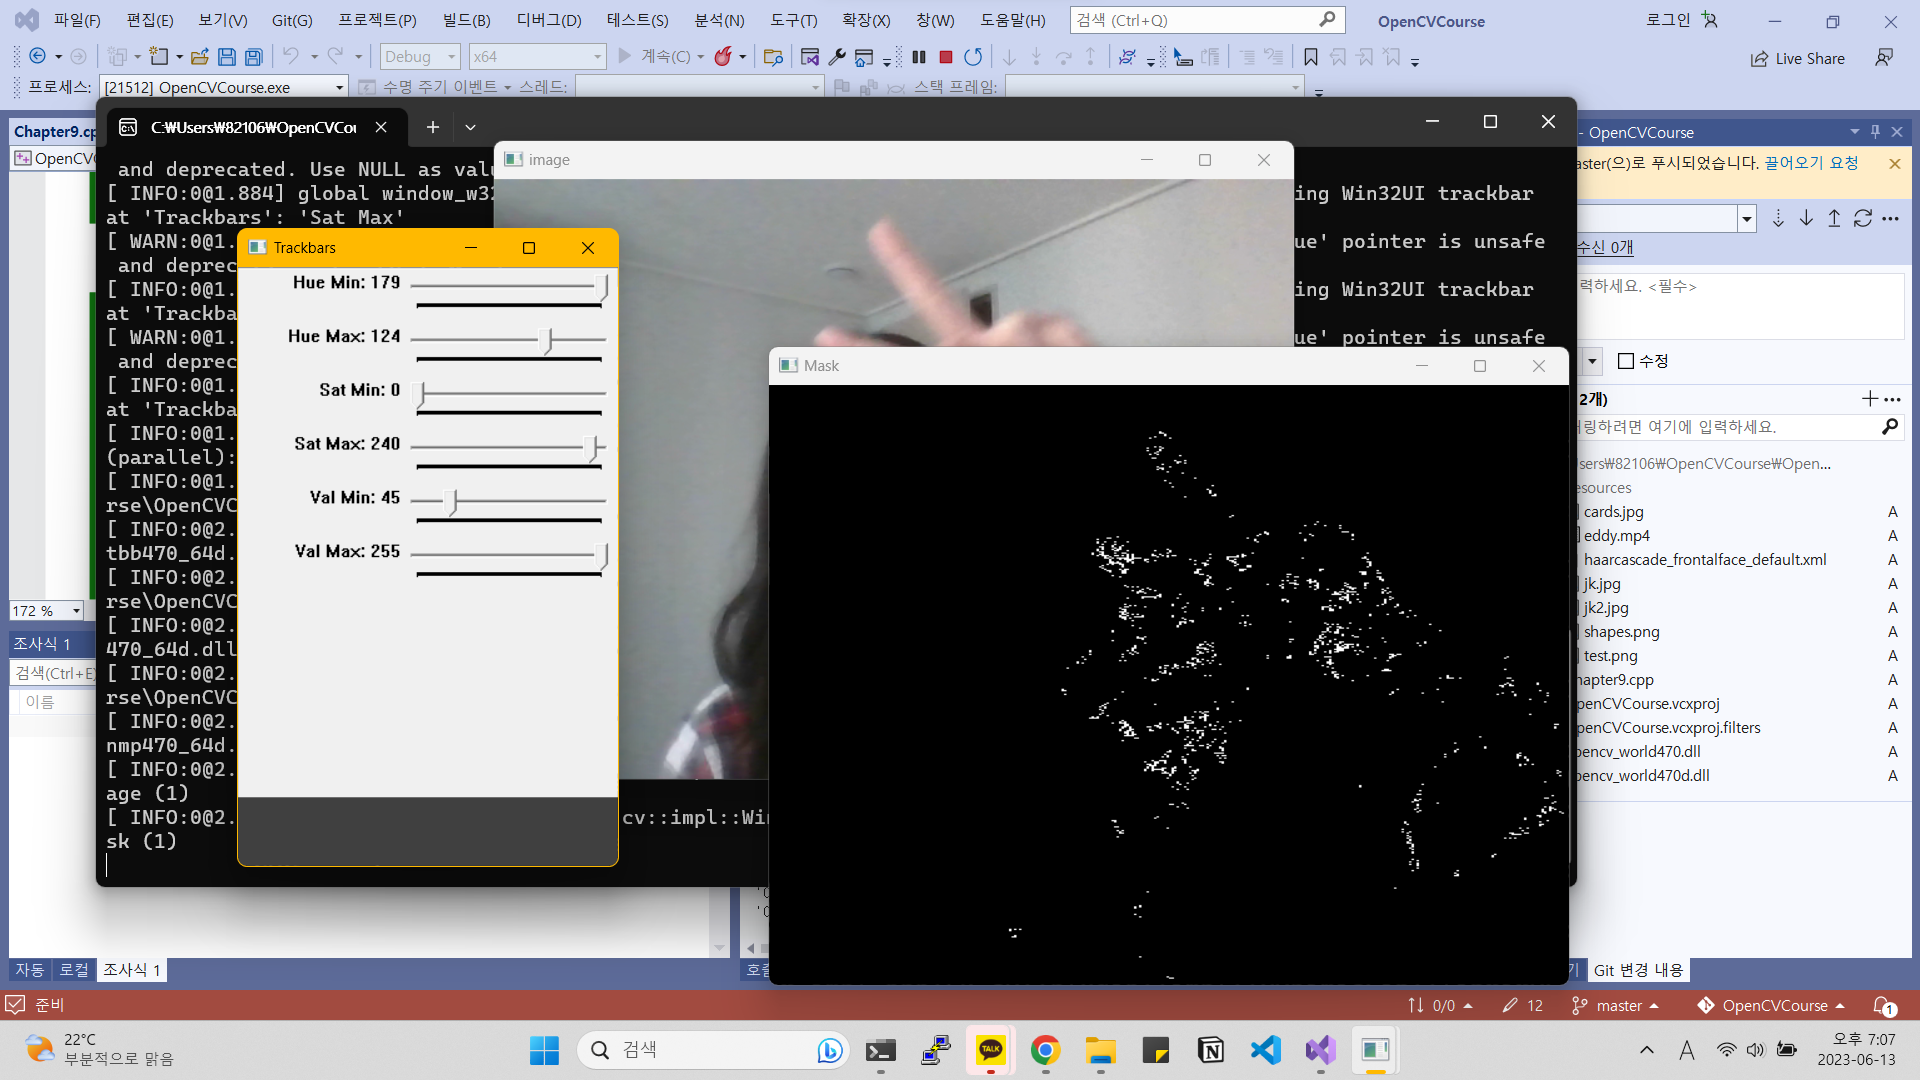
💧 Trackbar 로 이미지 mask 제어 하기
#include <opencv2/opencv.hpp>		// OpenCV에서 지원하는 모든 기능
#include <opencv2/videoio.hpp>		// 비디오 추적 및 배경 segmentation과 관련된 루틴
#include <opencv2/imgcodecs.hpp>	// 기본 데이터 타입이 선언 (Mat 이나 Point가 선언, 행렬 연산 혹은 벡터 연산)
#include <opencv2/highgui.hpp>		// 윈도우 화면, UI처리(슬라이더, 버튼 등) 및 마우스 제어 가능
#include <opencv2/objdetect.hpp>
#include <iostream>
#include <stdio.h>

using namespace cv;
using namespace std;

// #9. Project1 - Virtual Painter
Mat imgHSV, mask, imgColor;
int hmin = 0, smin = 110, vmin = 153;
int hmax = 19, smax = 240, vmax = 255;

Mat img;
VideoCapture cap(0);

int main() {
	namedWindow("Trackbars", (640, 200));
	createTrackbar("Hue Min", "Trackbars", &hmin, 179);
	createTrackbar("Hue Max", "Trackbars", &hmax, 179);
	createTrackbar("Sat Min", "Trackbars", &smin, 255);
	createTrackbar("Sat Max", "Trackbars", &smax, 255);
	createTrackbar("Val Min", "Trackbars", &vmin, 255);
	createTrackbar("Val Max", "Trackbars", &vmax, 255);

	while (true) {
		cap.read(img);

		cvtColor(img, imgHSV, COLOR_BGR2HSV);

		Scalar lower(hmin, smin, vmin);
		Scalar upper(hmin, smax, vmax);

		inRange(imgHSV, lower, upper, mask);

		imshow("image", img);
		imshow("Mask", mask);
		waitKey(1);
	}
}
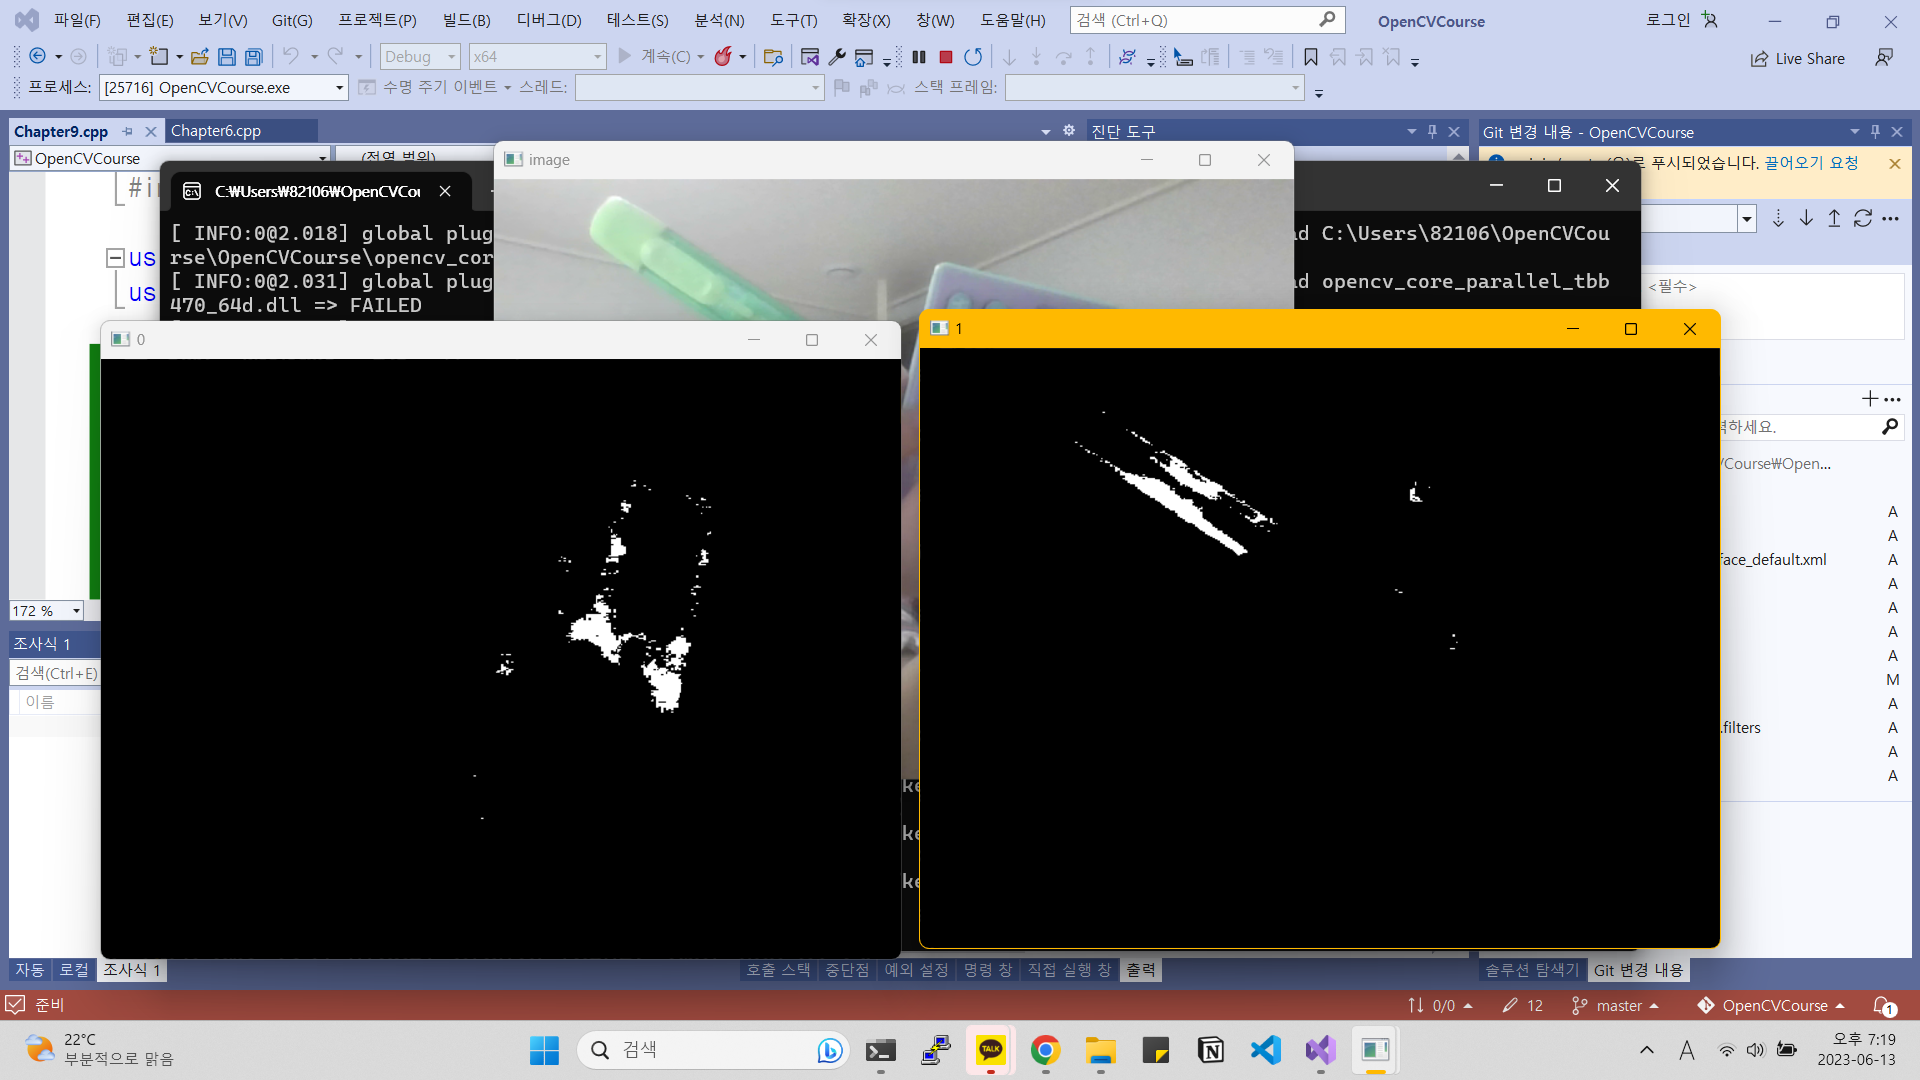
💧 purple 와 green 색깔의 mask 제어하기
#include <opencv2/opencv.hpp>		// OpenCV에서 지원하는 모든 기능
#include <opencv2/videoio.hpp>		// 비디오 추적 및 배경 segmentation과 관련된 루틴
#include <opencv2/imgcodecs.hpp>	// 기본 데이터 타입이 선언 (Mat 이나 Point가 선언, 행렬 연산 혹은 벡터 연산)
#include <opencv2/highgui.hpp>		// 윈도우 화면, UI처리(슬라이더, 버튼 등) 및 마우스 제어 가능
#include <opencv2/objdetect.hpp>
#include <iostream>
#include <stdio.h>

using namespace cv;
using namespace std;

// #9. Project1 - Virtual Painter
////////////////////  COLOR VALUES ////////////////////////////////
// hmin, smin, vmin, hmax, smax, vmax
vector<vector<int>> myColors{ {124,48,117,143,170,255},		// Purple
							   {68,72,156,102,126,255} };	// Green
vector<Scalar> myColorValues{ {255,0,255},		// Purple
							  {0,255,0} };		// Green

void findColor(Mat img) {
	Mat imgHSV;
	cvtColor(img, imgHSV, COLOR_BGR2HSV);

	for (int i = 0; i < myColors.size(); i++) {
		Scalar lower(myColors[i][0], myColors[i][1], myColors[i][2]);
		Scalar upper(myColors[i][3], myColors[i][4], myColors[i][5]);
		Mat mask;
		inRange(imgHSV, lower, upper, mask);
		imshow(to_string(i), mask);
	}
}

int main() {
	Mat img;
	VideoCapture cap(0);

	while (true) {
		cap.read(img);
		findColor(img);

		imshow("image", img);
		waitKey(1);
	}
}
💧 특정 color 일 때 Contours 하기
#include <opencv2/opencv.hpp>		// OpenCV에서 지원하는 모든 기능
#include <opencv2/videoio.hpp>		// 비디오 추적 및 배경 segmentation과 관련된 루틴
#include <opencv2/imgcodecs.hpp>	// 기본 데이터 타입이 선언 (Mat 이나 Point가 선언, 행렬 연산 혹은 벡터 연산)
#include <opencv2/highgui.hpp>		// 윈도우 화면, UI처리(슬라이더, 버튼 등) 및 마우스 제어 가능
#include <opencv2/objdetect.hpp>
#include <iostream>
#include <stdio.h>

using namespace cv;
using namespace std;

// #9. Project1 - Virtual Painter
Mat img;
////////////////////  COLOR VALUES ////////////////////////////////
// hmin, smin, vmin, hmax, smax, vmax
vector<vector<int>> myColors{ {124,48,117,143,170,255},		// Purple
							   {68,72,156,102,126,255} };	// Green
vector<Scalar> myColorValues{ {255,0,255},		// Purple
							  {0,255,0} };		// Green

void getContours(Mat imgDil) {
	vector<vector<Point>> contours;
	vector<Vec4i> hierarchy;

	// findContours(image, mode, method, contours=None, hierarchy=None, offset=None)
	// : 외곽선 검출이란 객체의 외곽선 좌표를 모두 추출하는 작업
	findContours(imgDil, contours, hierarchy, RETR_EXTERNAL, CHAIN_APPROX_SIMPLE);

	for (int i = 0; i < contours.size(); i++) {
		int area = contourArea(contours[i]);
		cout << area << endl;

		vector<vector<Point>> conPoly(contours.size());
		vector<Rect> boundRect(contours.size());
		string objectType;

		if (area > 1000) {
			float peri = arcLength(contours[i], true);

			// approxPolyDP(윤곽선, 근사치 정확도, 폐곡선)
			// : 윤곽선들의 윤곽점들로 근사해 근사 다각형으로 반환
			approxPolyDP(contours[i], conPoly[i], 0.02 * peri, true);

			cout << conPoly[i].size() << endl;
			boundRect[i] = boundingRect(conPoly[i]);

			int objCor = (int)conPoly[i].size();

			// 산술 계산을 통해 직사각형 or 정사각형 구분하기
			if (objCor == 3) { objectType = "Tri"; }
			else if (objCor == 4)
			{
				float aspRatio = (float)boundRect[i].width / (float)boundRect[i].height;
				cout << aspRatio << endl;
				if (aspRatio > 0.95 && aspRatio < 1.05) { objectType = "Square"; }
				else { objectType = "Rect"; }
			}
			else if (objCor > 4) { objectType = "Circle"; }

			// drawContours(image, contours, contourIdx, color, thickness=None, lineType=No)
			// : 검출한 외곽선을 확인하기 위해 이 함수를 이용하여 외곽선을 화면에 그리기
			drawContours(img, conPoly, i, Scalar(255, 0, 255), 2);
		}
	}
}

void findColor(Mat img) {
	Mat imgHSV;
	cvtColor(img, imgHSV, COLOR_BGR2HSV);

	for (int i = 0; i < myColors.size(); i++) {
		Scalar lower(myColors[i][0], myColors[i][1], myColors[i][2]);
		Scalar upper(myColors[i][3], myColors[i][4], myColors[i][5]);
		Mat mask;
		inRange(imgHSV, lower, upper, mask);
		//imshow(to_string(i), mask);
		getContours(mask);
	}
}

int main() {
	VideoCapture cap(0);

	while (true) {
		cap.read(img);
		findColor(img);

		imshow("image", img);
		waitKey(1);
	}
}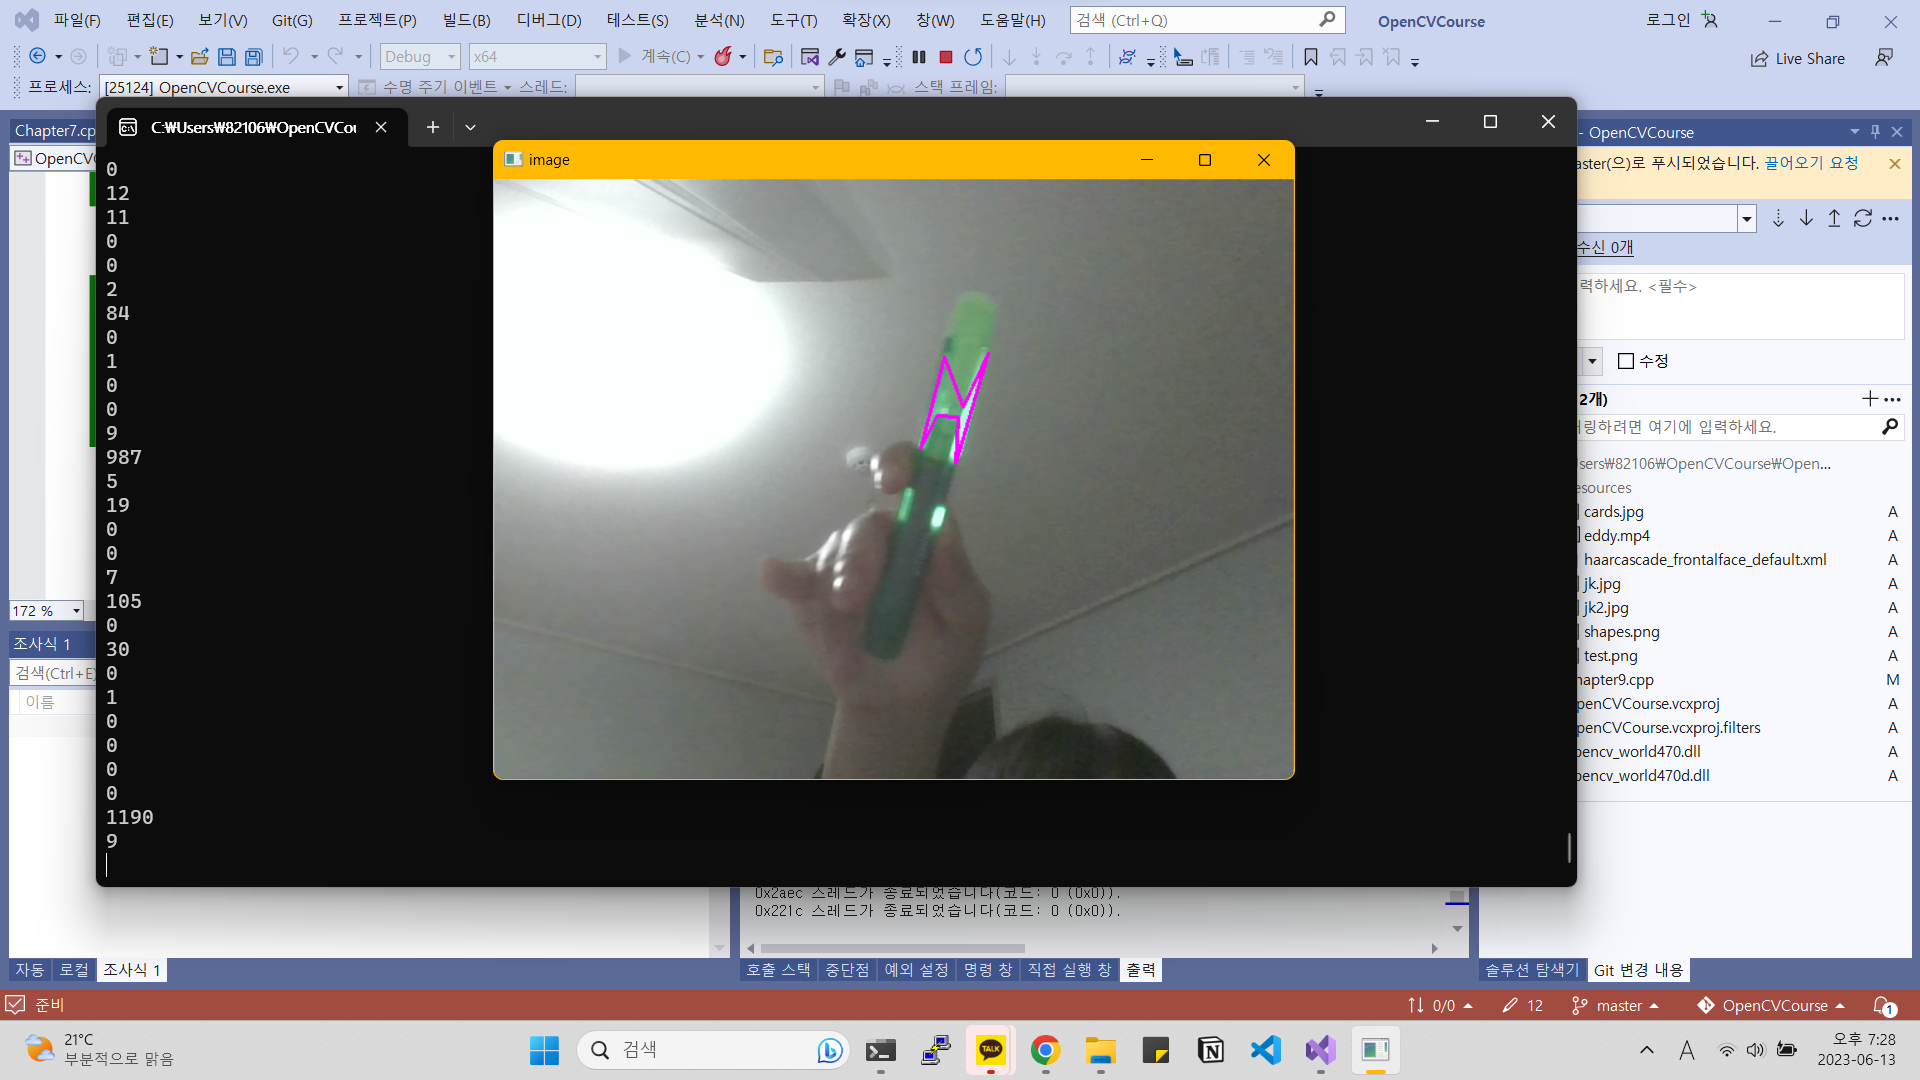
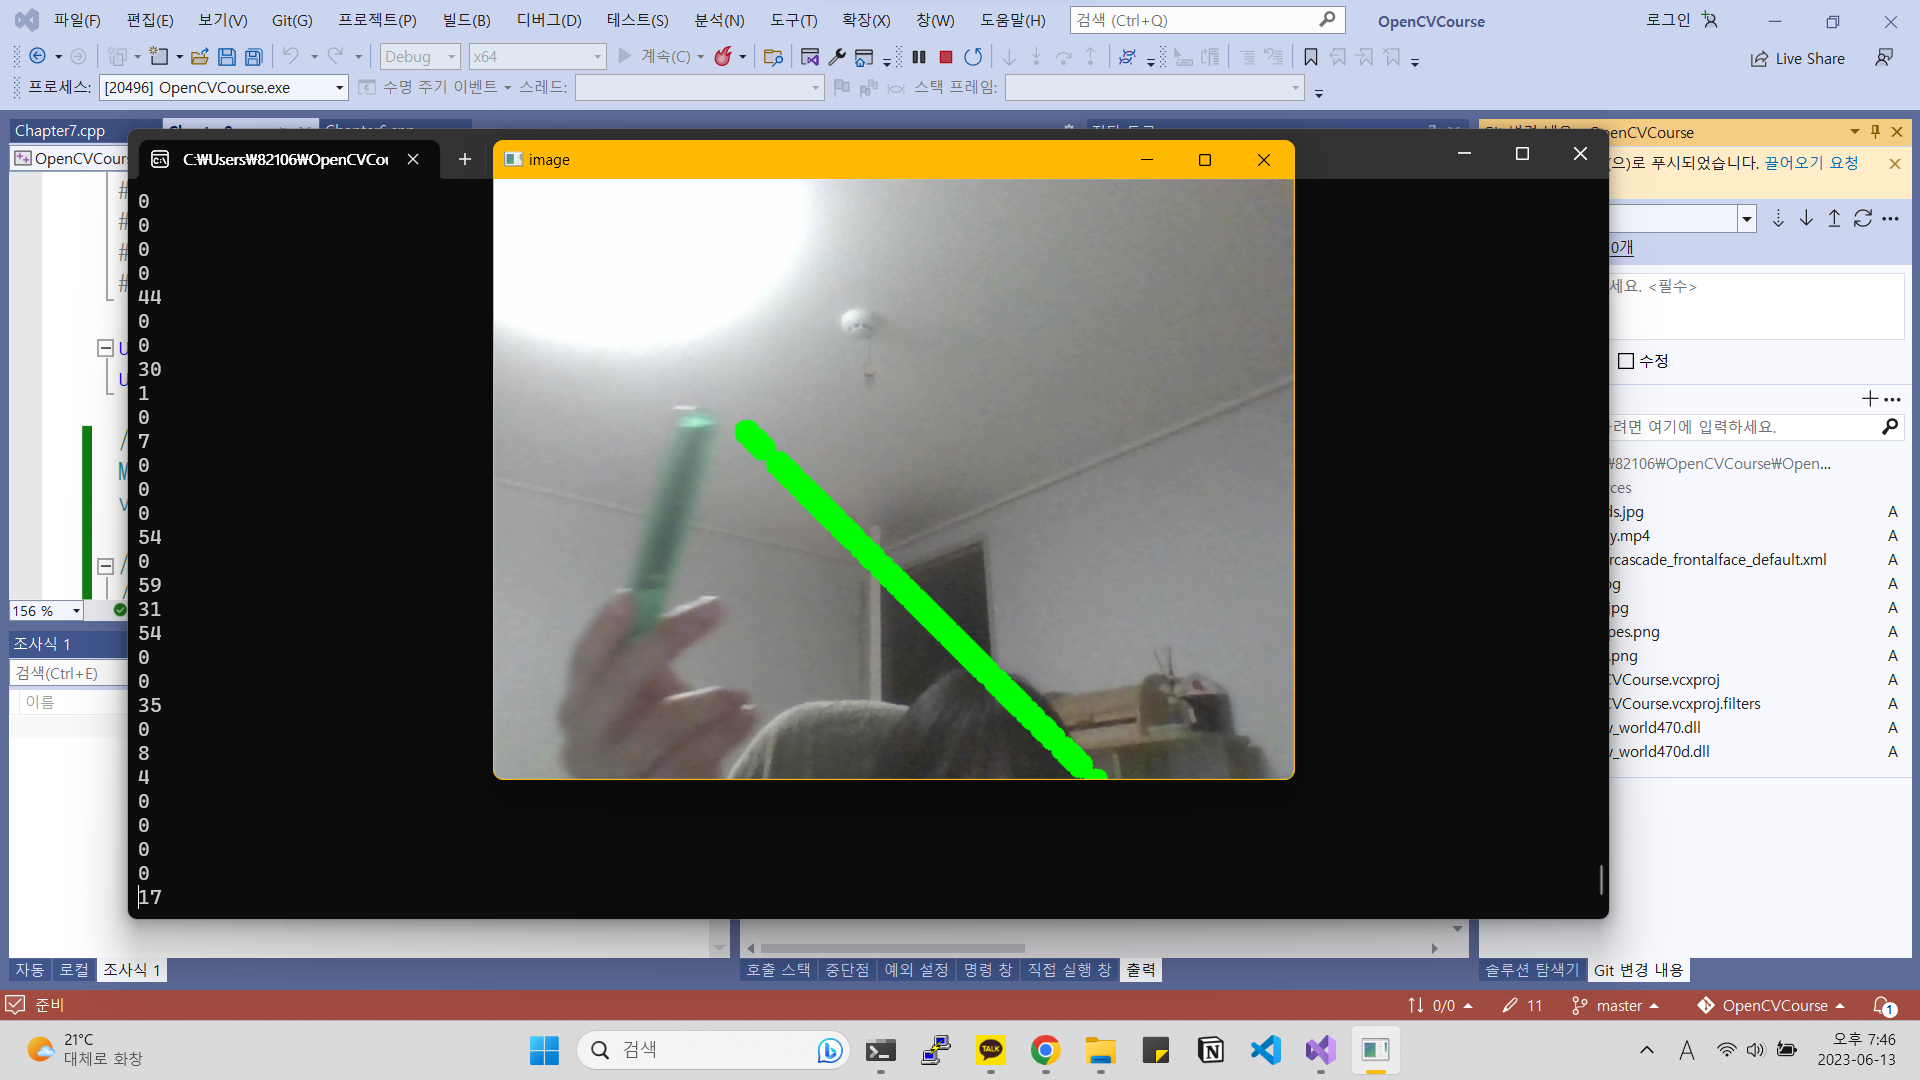
💧 Detection 되는 color 로 그림 그리기
#include <opencv2/opencv.hpp>		// OpenCV에서 지원하는 모든 기능
#include <opencv2/videoio.hpp>		// 비디오 추적 및 배경 segmentation과 관련된 루틴
#include <opencv2/imgcodecs.hpp>	// 기본 데이터 타입이 선언 (Mat 이나 Point가 선언, 행렬 연산 혹은 벡터 연산)
#include <opencv2/highgui.hpp>		// 윈도우 화면, UI처리(슬라이더, 버튼 등) 및 마우스 제어 가능
#include <opencv2/objdetect.hpp>
#include <iostream>
#include <stdio.h>

using namespace cv;
using namespace std;

// #9. Project1 - Virtual Painter
Mat img;
VideoCapture cap(0);
vector<vector<int>> newPoints;  // to store all points

////////////////////  COLOR VALUES ////////////////////////////////
// hmin, smin, vmin, hmax, smax, vmax
vector<vector<int>> myColors{ {124,48,117,143,170,255},		// Purple
							   {68,72,156,102,126,255} };	// Green
vector<Scalar> myColorValues{ {255,0,255},		// Purple
							  {0,255,0} };		// Green

Point getContours(Mat imgDil) {
	vector<vector<Point>> contours;
	vector<Vec4i> hierarchy;

	// findContours(image, mode, method, contours=None, hierarchy=None, offset=None)
	// : 외곽선 검출이란 객체의 외곽선 좌표를 모두 추출하는 작업
	findContours(imgDil, contours, hierarchy, RETR_EXTERNAL, CHAIN_APPROX_SIMPLE);
	vector<vector<Point>> conPoly(contours.size());
	vector<Rect> boundRect(contours.size());
	Point myPoint(0, 0);

	for (int i = 0; i < contours.size(); i++) {
		int area = contourArea(contours[i]);
		cout << area << endl;

		string objectType;

		if (area > 1000) {
			float peri = arcLength(contours[i], true);

			// approxPolyDP(윤곽선, 근사치 정확도, 폐곡선)
			// : 윤곽선들의 윤곽점들로 근사해 근사 다각형으로 반환
			approxPolyDP(contours[i], conPoly[i], 0.02 * peri, true);

			cout << conPoly[i].size() << endl;
			boundRect[i] = boundingRect(conPoly[i]);
			myPoint.x = boundRect[i].x + boundRect[i].width / 2;
			myPoint.y = boundRect[i].y;

			// drawContours(image, contours, contourIdx, color, thickness=None, lineType=No)
			// : 검출한 외곽선을 확인하기 위해 이 함수를 이용하여 외곽선을 화면에 그리기
			//drawContours(img, conPoly, i, Scalar(255, 0, 255), 2);
			//rectangle(img, boundRect[i].tl(), boundRect[i].br(), Scalar(0, 255, 0), 5);
		}
	}
	return myPoint;
}

vector<vector<int>> findColor(Mat img) {
	Mat imgHSV;
	cvtColor(img, imgHSV, COLOR_BGR2HSV);

	for (int i = 0; i < myColors.size(); i++) {
		Scalar lower(myColors[i][0], myColors[i][1], myColors[i][2]);
		Scalar upper(myColors[i][3], myColors[i][4], myColors[i][5]);
		Mat mask;
		inRange(imgHSV, lower, upper, mask);
		//imshow(to_string(i), mask);
		Point myPoint = getContours(mask);

		if (myPoint.x != 0 && myPoint.y != 0) {
			newPoints.push_back({ myPoint.x, myPoint.y, i });
		}
	}
	return newPoints;
}

void drawOnCanvas(vector<vector<int>> newPoints, vector<Scalar> myColorValues) {
	for (int i = 0; i < newPoints.size(); i++) {
		circle(img, Point(newPoints[i][0], newPoints[i][1]), 10, myColorValues[newPoints[i][2]], FILLED);
	}
}

int main() {
	VideoCapture cap(0);

	while (true) {
		cap.read(img);
		newPoints = findColor(img);
		drawOnCanvas(newPoints, myColorValues);

		imshow("image", img);
		waitKey(1);
	}
}
728x90
반응형
'👩💻 IoT (Embedded) > Image Processing' 카테고리의 다른 글
| [C++ 로 OpenCV 구현하기] (11) Project3 - License Plate Detector (0) | 2023.06.14 |
|---|---|
| [C++ 로 OpenCV 구현하기] (10) Project2 - Document Scanner (1) | 2023.06.14 |
| [C++ 로 OpenCV 구현하기] (8) Face Detection (0) | 2023.06.13 |
| [C++ 로 OpenCV 구현하기] (7) Shapes/Contour Detection (0) | 2023.06.12 |
| [C++ 로 OpenCV 구현하기] (6) Color Detection (0) | 2023.06.12 |
'👩💻 IoT (Embedded)/Image Processing' Related Articles
more


Comments